Ever tripped over a wave in your carpet? That pesky buckling can be more than just an eyesore; it's a safety hazard waiting to happen. But don't worry, you don't necessarily need to call in a professional. Fixing buckled carpet is often a DIY project you can tackle yourself with a little patience and the right tools. Let's explore how to get your carpet smooth and flat again! Why is My Carpet Buckling? Understanding the Root Causes Before you dive into fixing the problem, it's helpful to understand why your carpet is buckling in the first place. Identifying the cause will not only help you choose the right solution but also prevent the problem from recurring. Common Culprits Behind Carpet Buckling: Improper Installation: This is the most frequent offender. If the carpet wasn't stretched correctly during installation, it's prone to loosening and buckling over time. Humidity: Excessive moisture can cause the carpet fibers and...
Oh no! That beautiful hardwood floor you invested in is starting to look a little… wavy? Warped hardwood floors are a frustrating problem, but don't panic! Before you rip everything up and start from scratch, there's a good chance you can remedy the situation and bring your floor back to its former glory. Let's explore the common causes of warping and the steps you can take to fix that warped hardwood floor.
Understanding Warped Hardwood Floors
First, let's understand what we're dealing with. Warping in hardwood floors happens when the wood expands and contracts unevenly, causing it to cup, buckle, or crown. This is usually due to moisture imbalances, but other factors can contribute. Recognizing the symptoms and diagnosing the cause is crucial before attempting any repairs. It's like a doctor examining a patient before prescribing medication – we need to understand the problem before we can solve it!
Common Causes of Warping
Identifying the underlying cause is the first step in addressing a warped hardwood floor effectively. Ignoring the root problem will only lead to the warping returning even after repair attempts. Here's a breakdown of the most common culprits:
- Excessive Moisture: This is the biggest offender. Spills, leaks (even small ones!), high humidity, and poor ventilation can all lead to moisture absorption in the wood, causing it to expand.
- Water Damage: Leaking pipes, flooding, or even appliances like dishwashers or washing machines that overflow can saturate the wood fibers.
- Inadequate Acclimation: Hardwood needs time to adjust to the humidity levels in your homebeforeinstallation. Failing to acclimate properly sets the stage for warping later. A good rule of thumb is to leave the wood in the room where it will be installed for at least 3-5 days. This allows the wood to equalize its moisture content with the surrounding environment.
- Poor Subfloor: An uneven or damp subfloor can contribute to warping. The subfloor should be level, dry, and structurally sound before any hardwood is installed.
- Improper Installation: Gaps that are too small between boards can prevent expansion, leading to buckling. Conversely, if the boards are not properly secured, they can move and warp.
Types of Warping
Understanding the different types of warping can help you identify the problem and choose the best course of action. There are three main types of warping:
- Cupping: The edges of the boards are higher than the center, creating a concave shape. This is typically caused by excessive moisture on the underside of the boards.
- Crowning: The center of the boards is higher than the edges, creating a convex shape. This is often the result of cupping that has been corrected too quickly, leading to the center drying out and shrinking more than the edges.
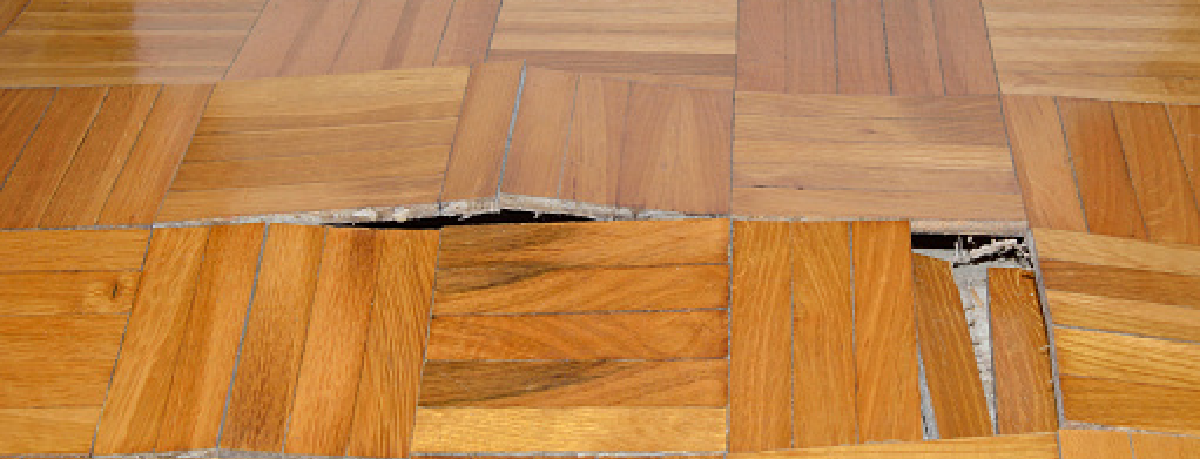
- Buckling: The boards lift completely off the subfloor, creating a wave-like appearance. This is usually caused by extreme moisture exposure or inadequate expansion gaps.
How To Diagnose the Issue
Before you grab your toolbox, take some time to investigate. A thorough diagnosis will save you time and effort in the long run. Here’s how to approach it:
- Visual Inspection: Carefully examine the floor. Note the location and severity of the warping. Is it localized to one area, or is it widespread? Identify the type of warping (cupping, crowning, buckling).
- Moisture Meter Reading: This is a crucial step. A moisture meter will tell you the moisture content of the wood. Compare readings in the affected area to those in unaffected areas. A significant difference indicates a moisture problem. You can find moisture meters at most hardware stores. Aim for moisture content between 6-8% for most climates.
- Check for Leaks: Look for any signs of leaks from plumbing, appliances, or the roof. Even small, slow leaks can cause significant damage over time. Check under sinks, around toilets, and near exterior walls.
- Inspect the Subfloor: If possible, check the subfloor for moisture. You may need to remove a section of the flooring to do this. Look for signs of water damage, mold, or rot.
- Review Installation Records: If you have them, review the installation records to see if the wood was properly acclimated and installed. This can help you identify potential installation-related issues.
Fixing a Warped Hardwood Floor: DIY Solutions
Now, let's get to the good stuff – the solutions! Depending on the severity and cause of the warping, you might be able to tackle the repairs yourself. Here are some DIY methods tofix warped wood floors:
Addressing Moisture Problems
Tackling the source of the moisture is paramount. Here’s how to do it:
- Fix Leaks: Repair any plumbing leaks immediately. Even a small drip can cause significant damage over time. Call a plumber if needed.
- Improve Ventilation: Increase airflow in the affected area. Open windows, use fans, and consider installing a dehumidifier to remove excess moisture from the air.
- Dry the Area: Use fans and dehumidifiers to dry out the affected area as quickly as possible. You can also use absorbent materials like towels or blankets to soak up excess water.
- Address Humidity: In humid climates, running a dehumidifier during the most humid months can help maintain a consistent moisture level in your home and prevent future warping.
Weight and Time
For minor cupping or crowning, applying weight can sometimes help flatten the boards over time. This method works best when combined with moisture control. You'll need to be patient, as it can take several weeks or even months to see results.
- Prepare the Area: Clean the floor thoroughly and ensure it's dry.
- Apply Weight: Place heavy objects, such as books, weights, or furniture, over the warped area. Distribute the weight evenly to avoid creating new problems.
- Monitor Progress: Check the floor regularly to see if the warping is improving. Adjust the weight as needed.
- Patience is Key: This method requires time and patience. Don't expect to see results overnight.
Heat Treatment
Applying heat can sometimes help dry out the wood and flatten it. However, this method should be used with caution, as excessive heat can damage the floor. The heat gun method needs to be done with caution since you need to avoid scorching the finish or damaging the wood.
- Use a Heat Gun or Hair Dryer: Set the heat gun or hair dryer to a low setting.
- Apply Heat Evenly: Slowly move the heat source over the warped area, keeping it a few inches away from the floor. Avoid concentrating the heat in one spot.
- Monitor Temperature: Check the temperature of the floor regularly to avoid overheating.
- Allow to Cool: After heating, allow the floor to cool naturally.
- Repeat as Needed: Repeat the process several times, as needed.
Replacing Damaged Boards
If the warping is severe or the boards are damaged beyond repair, you may need to replace them. This is a more involved process, but it can be necessary to restore the floor to its original condition. Here's a simplified overview:
- Remove the Damaged Board: Carefully remove the damaged board using a chisel, pry bar, or circular saw. Be careful not to damage the surrounding boards.
- Prepare the Replacement Board: Cut the replacement board to the correct size and shape. Ensure it matches the existing flooring in terms of species, color, and grain.
- Install the Replacement Board: Apply adhesive to the subfloor and position the replacement board in place. Secure it with nails or screws.
- Finishing Touches: Fill any gaps with wood filler and sand the area smooth. Apply a matching stain and finish to blend the replacement board with the existing flooring.
When to Call a Professional
Sometimes, DIY solutions just won't cut it. If you're dealing with any of the following scenarios, it's best to call in a professional flooring contractor:
- Extensive Damage: If a large area of your floor is warped, or if the damage is severe, a professional will have the tools and expertise to handle the repairs efficiently.
- Uncertain Cause: If you can't identify the cause of the warping, a professional can help you diagnose the problem and recommend the best course of action.
- Subfloor Issues: If the subfloor is damaged or uneven, it will need to be repaired or replaced before the hardwood flooring can be fixed. This is a job best left to professionals.
- DIY Inexperience: If you're not comfortable working with tools or tackling home improvement projects, it's best to hire a professional.
Preventing Future Warping
Prevention is always better than cure! Here are some tips to help you prevent warping in your hardwood floors:
- Control Humidity: Maintain a consistent humidity level in your home, especially during humid months. Use a dehumidifier if necessary.
- Clean Up Spills Immediately: Wipe up spills as soon as they happen. Don't let water sit on the floor for any length of time.
- Use Mats and Rugs: Place mats and rugs in high-traffic areas and near entryways to protect the floor from dirt, moisture, and wear.
- Regularly Inspect Plumbing: Check for leaks regularly and repair them promptly.
- Acclimate New Flooring: Always acclimate new hardwood flooring before installation.
Warped hardwood floors are a pain, but with a little knowledge and effort, you can often fix the problem yourself. Remember to identify the cause, choose the appropriate solution, and don't be afraid to call in a professional if needed. By taking these steps, you can restore your hardwood floor to its former beauty and enjoy it for years to come.