Ever tripped over a wave in your carpet? That pesky buckling can be more than just an eyesore; it's a safety hazard waiting to happen. But don't worry, you don't necessarily need to call in a professional. Fixing buckled carpet is often a DIY project you can tackle yourself with a little patience and the right tools. Let's explore how to get your carpet smooth and flat again! Why is My Carpet Buckling? Understanding the Root Causes Before you dive into fixing the problem, it's helpful to understand why your carpet is buckling in the first place. Identifying the cause will not only help you choose the right solution but also prevent the problem from recurring. Common Culprits Behind Carpet Buckling: Improper Installation: This is the most frequent offender. If the carpet wasn't stretched correctly during installation, it's prone to loosening and buckling over time. Humidity: Excessive moisture can cause the carpet fibers and...
That sinking feeling when you spot a lifted wallpaper seam – we've all been there! It's like a tiny rebellion against your perfectly decorated walls, threatening to unravel all your hard work. But don't panic! Fixing wallpaper seams is a surprisingly simple DIY project, and with the right tools and a little patience, you can restore your walls to their former glory.
Understanding Why Wallpaper Seams Fail
Before we dive into the 'how-to', it's useful to understand why wallpaper seams sometimes fail in the first place. Knowing the cause can help you prevent future problems and choose the right approach for fixing the seam.
Several factors can contribute to loose wallpaper seams:
Insufficient Paste: This is a common culprit. If not enough adhesive was applied during the initial installation, the edges may not adhere properly, leading to lifting over time.
Poor Surface Preparation: A dirty, dusty, or uneven wall surface will prevent the wallpaper paste from creating a strong bond. This often leads to issues especially at the seams.
Temperature and Humidity Fluctuations: Changes in temperature and humidity can cause the wallpaper to expand and contract, putting stress on the seams and potentially causing them to separate. Consider using wallpaper designed for high-humidity areas, like bathrooms, in such places to reduce expansion and contraction.
Inadequate Overlap (or Lack Thereof): In some wallpaper installations, a slight overlap is recommended. If the overlap is too small or non-existent, the seam may be more vulnerable. Conversely, if the overlap is too large, it can create a visible ridge that's prone to lifting. Butt-jointing wallpaper (aligning edges exactly without overlap) requires perfectly prepared walls and meticulous installation for the seams to remain tight.
Wallpaper Type: Some wallpaper types are more prone to seam issues than others. For instance, thinner, unpasted wallpapers can be more challenging to install and maintain at the seams compared to thicker, pre-pasted varieties or even non-woven wallpaper.
Old Paste or Adhesive Degradation: Over time, the adhesive holding the wallpaper can degrade, especially in areas exposed to moisture or heat.
Tools You'll Need to Fix Loose Wallpaper Seams
Having the right tools on hand will make thewallpaper seam repair process smoother and more efficient. Here's a list of essentials:
Seam Roller: This small, handheld roller is crucial for pressing the wallpaper seam back into place and ensuring a strong bond. Choose one with a smooth, non-marking surface.
Seam Adhesive/Wallpaper Paste: This specialized adhesive is designed for repairing wallpaper seams. Make sure to select a type compatible with your wallpaper material. Some pastes are designed for heavy-duty papers, while others are more suitable for delicate wallpapers.
Utility Knife or Razor Blade: For trimming any excess wallpaper or removing loose pieces. Ensure it has a sharp blade to avoid tearing the wallpaper.
Smoothing Tool or Plastic Spatula: Helps to smooth out the wallpaper and remove any air bubbles.
Small Paint Brush: For applying the seam adhesive precisely.
Clean Sponge or Damp Cloth: For wiping away excess adhesive and cleaning the area.
Wallpaper Smoothing Brush: Used to gently smooth the wallpaper during the initial installation or when re-adhering a seam. Its soft bristles prevent damage.
Straight Edge or Metal Ruler: Use this in conjunction with the utility knife to ensure straight, clean cuts.
Drop Cloth or Protective Covering: To protect your floor and furniture from paste drips.
How to Fix Wallpaper Seams: A Step-by-Step Guide
Now, let's get down to business! Here's a detailed, step-by-step guide onhow to fix wallpaper seams:
Step 1: Preparation is Key
Begin by thoroughly cleaning the area around the loose seam. Use a damp sponge or cloth to remove any dust, dirt, or debris. Allow the area to dry completely. This ensures a clean surface for the adhesive to bond to. Failure to prepare the surface can result in the seam coming loose again quickly.
Step 2: Apply Seam Adhesive
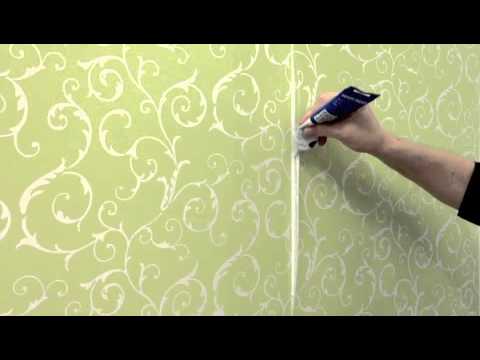
Carefully lift the loose edge of the wallpaper. Using a small paint brush, apply a thin, even layer of seam adhesive to the back of the wallpaper and the wall beneath. Be careful not to apply too much adhesive, as this can squeeze out and create a mess. It is more important to focus on even application. You can also purchase a hypodermic needle applicator that makes this process much cleaner.
Tip:If the old adhesive is crumbly or failing to adhere, carefully remove it with a scraper or putty knife before applying fresh adhesive.
Step 3: Re-adhere the Seam
Gently press the wallpaper back into place, aligning the edges carefully. Use your fingers or a smoothing tool to remove any air bubbles or wrinkles. Make sure the seam is flush with the adjacent wallpaper. It should blend into the wall naturally. This is where the seam roller comes in. Use the seam roller to firmly press the seam along its entire length. Apply consistent pressure to ensure a strong bond. Roll from the center outwards to avoid trapping air.
Step 4: Clean Up Excess Adhesive
Immediately wipe away any excess adhesive that squeezes out with a clean, damp sponge or cloth. If the adhesive dries on the surface, it can be difficult to remove and may leave a shiny residue. Wiping the area with gentle strokes will remove any excess adhesive that is on the surface.
Step 5: Trim Excess Wallpaper (If Necessary)
If there is any overlapping wallpaper that is causing a ridge or preventing the seam from lying flat, carefully trim it away using a utility knife or razor blade and a straight edge. Hold the straight edge firmly against the wall and make a clean, precise cut. Remove the excess piece. Be extremely cautious when using a blade to avoid cutting into the wall itself.
Step 6: Final Touches
Allow the adhesive to dry completely according to the manufacturer's instructions. This usually takes a few hours. Avoid touching the repaired seam during this time. Once the adhesive is dry, inspect the seam to ensure it is securely bonded and looks smooth. If necessary, apply another light pass with the seam roller. You can also wipe it down with a dry, clean cloth.
Dealing with Common Seam Problems
While the basicwallpaper seam repair process is straightforward, you might encounter some specific challenges. Here's how to tackle them:
Shrunken Wallpaper: If the wallpaper has shrunk, leaving a gap at the seam, you may need to carefully stretch the wallpaper back into place. Apply a small amount of heat from a hairdryer to soften the wallpaper before stretching it. Be careful not to overheat the wallpaper, as this could damage it. If stretching isn't possible, you might consider using a color-matched caulk or sealant to fill the gap.
Torn or Damaged Wallpaper: If the wallpaper is torn or damaged at the seam, you may need to patch it. Cut out a small piece of matching wallpaper (you might need to use a piece from an inconspicuous area, like behind furniture). Apply adhesive to the patch and carefully position it over the damaged area, matching the pattern. Use a seam roller to smooth the patch and blend it with the surrounding wallpaper.
Stubborn Seams: If the seam refuses to stay down, you may need to use a stronger adhesive or apply more pressure with the seam roller. You can also try using a wallpaper seam activator, which is a solvent that softens the adhesive and allows it to bond more effectively.
Preventing Future Wallpaper Seam Problems
Prevention is always better than cure. Here are some tips to help you prevent future wallpaper seam issues:
Proper Surface Preparation: Always clean and prime the wall surface before installing wallpaper. This ensures a strong bond and prevents moisture from seeping in.
Use High-Quality Wallpaper Paste: Choose a wallpaper paste that is specifically designed for the type of wallpaper you are using.
Apply Paste Generously: Don't skimp on the paste! Make sure to apply a sufficient amount to the edges of the wallpaper.
Overlap Seams (If Recommended): Follow the wallpaper manufacturer's instructions regarding seam overlap.
Control Temperature and Humidity: Avoid extreme temperature and humidity fluctuations in the room.
Consider Hiring a Professional: If you're not comfortable installing wallpaper yourself, consider hiring a professional. A skilled installer will ensure that the seams are properly aligned and sealed.
When to Call a Professional
While manywallpaper seam repair projects can be handled by DIYers, there are situations where it's best to call in a professional. These include:
Extensive Damage: If the wallpaper is severely damaged or there are multiple seams that need repair, it may be more cost-effective and time-efficient to hire a professional. Difficult Patterns: Wallpaper with intricate patterns or textures can be challenging to repair seamlessly. A professional will have the skills and experience to match the pattern and ensure a flawless finish. Old or Delicate Wallpaper: If you're dealing with old or delicate wallpaper, it's best to leave the repairs to a professional to avoid further damage. Lack of Confidence: If you're not comfortable working with wallpaper or you're worried about making mistakes, don't hesitate to call a professional.
Fixing wallpaper seams is a manageable DIY project that can significantly improve the look of your walls. By understanding the causes of seam failure, using the right tools, and following these step-by-step instructions, you can restore your wallpaper to its original beauty. Remember to take your time, be patient, and don't be afraid to seek professional help if needed.