Ever tripped over a wave in your carpet? That pesky buckling can be more than just an eyesore; it's a safety hazard waiting to happen. But don't worry, you don't necessarily need to call in a professional. Fixing buckled carpet is often a DIY project you can tackle yourself with a little patience and the right tools. Let's explore how to get your carpet smooth and flat again! Why is My Carpet Buckling? Understanding the Root Causes Before you dive into fixing the problem, it's helpful to understand why your carpet is buckling in the first place. Identifying the cause will not only help you choose the right solution but also prevent the problem from recurring. Common Culprits Behind Carpet Buckling: Improper Installation: This is the most frequent offender. If the carpet wasn't stretched correctly during installation, it's prone to loosening and buckling over time. Humidity: Excessive moisture can cause the carpet fibers and...
That faded, chalky look on your car's paint job isn't just unsightly, it's a sign your car is aging faster than it should! Oxidized paint is a common problem, but don't despair, you can often bring that shine back to life with a little elbow grease and the right techniques. We're going to walk you through everything you need to know about how to fix oxidized car paint, turning back the clock and restoring your car's vibrant appearance.
Understanding Car Paint Oxidation
Before we dive into the "how-to," it's important to understandwhycar paint oxidizes in the first place. Oxidation is essentially the reaction of the paint's clear coat with oxygen in the air. This reaction is accelerated by factors like UV rays from the sun, acid rain, environmental pollutants, and even harsh car washing detergents. Think of it like rust, but for your paint. The clear coat, the protective layer on top of your car's paint, slowly breaks down. As the clear coat degrades, it becomes porous and less reflective, resulting in that dull, chalky look. Early signs of oxidation might be subtle, but if left untreated, it can lead to the base coat being exposed and further damage.
Identifying Oxidized Car Paint
Knowing the signs of oxidation is the first step in knowing if you need to fix it! Here are a few telltale signs that your car's paint is suffering from oxidation:
- Faded Color: The paint appears less vibrant and the color seems washed out.
- Chalky White Residue: When you run your hand over the paint, you might notice a chalky white residue on your hand. This is oxidized paint particles.
- Rough Texture: The paint feels rough and uneven instead of smooth and glossy.
- Loss of Shine: The paint doesn't reflect light as well as it used to, resulting in a dull appearance.
- Water Beading Issues: Water no longer beads up nicely on the surface of the paint; instead, it spreads out and clings to the surface. This is because the protective properties of the clear coat have been compromised.
Consider this scenario: You purchase a brand new red sports car. After a year of parking it outside, exposed to the harsh summer sun and winter snow, you notice the once vibrant red is now a faded, almost pinkish hue. When you wash it, you notice the water doesn't bead up like it used to, and there's a slight chalky residue on your wash mitt. This is a classic case of oxidation, and a clear sign it's time to take action and fix your oxidized car paint!
Preparing to Fix Oxidized Car Paint
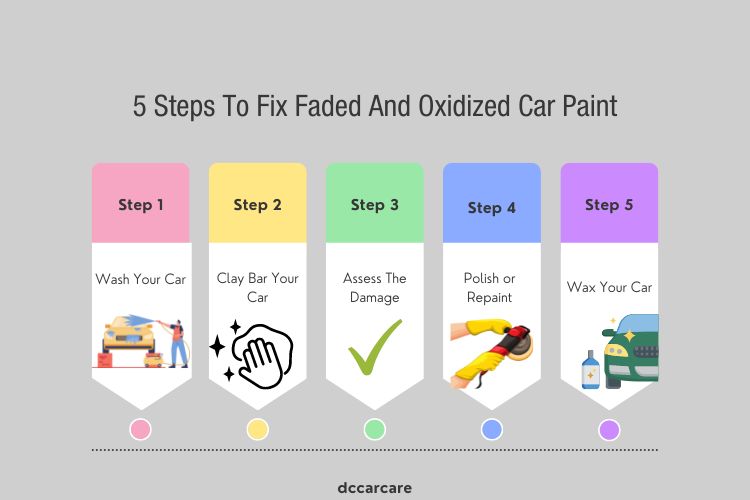
Proper preparation is key to successful paint restoration. Before you start polishing or using any products, you need to thoroughly clean the car and assess the extent of the oxidation. Failing to prepare adequately can lead to further damage and a less than satisfactory result. Here's a step-by-step guide to preparing your car:
Washing Your Car
The first step is to thoroughly wash your car. This removes dirt, grime, and other contaminants that could scratch the paint during the polishing process. Use a p H-neutral car wash soap and a soft microfiber wash mitt. Wash in a shaded area to prevent the soap from drying on the paint. Rinse thoroughly and dry with a clean microfiber towel.
Clay Bar Treatment
A clay bar is essential for removing embedded contaminants that washing alone can't remove. These contaminants, such as industrial fallout, tree sap, and brake dust, can prevent polishing compounds from effectively removing oxidation. Lubricate the surface with a clay bar lubricant and gently glide the clay bar over the paint. Knead the clay bar frequently to expose a clean surface. A good clay bar session can significantly improve the results of your polishing efforts. Many professional detailers swear by clay barring before any polishing work to ensure a smooth, clean surface.
Taping Off Sensitive Areas
Protect any sensitive areas of your car, such as plastic trim, rubber seals, and headlights, with painter's tape. This prevents these areas from being stained or damaged by polishing compounds. It's a simple step that can save you a lot of time and effort in the long run.
Assessing the Damage
After cleaning and prepping, carefully inspect the paint to determine the extent of the oxidation. If the oxidation is mild, you might be able to correct it with a simple polish. However, if the oxidation is severe, you might need to use a more aggressive compound or even consider professional detailing. Look closely at how deeply the chalkiness penetrates and whether the base coat is visibly damaged.
Steps to Fix Oxidized Car Paint
Now comes the main event: fixing the oxidation! The process generally involves using a polishing compound to remove the oxidized layer of paint, followed by polishing and waxing to restore the shine and protect the paint. The method you choose depends on the severity of the oxidation. Always test your chosen method on a small, inconspicuous area first.
Polishing with Compound
Polishing is a crucial step in how to fix oxidized car paint. It involves using an abrasive compound to remove the oxidized layer of paint. There are different types of polishing compounds available, ranging from light to heavy cut. Start with a less abrasive compound and work your way up if necessary. Using too aggressive of a compound can remove too much clear coat. Here's how to use polishing compound:
- Apply a small amount of polishing compound to a polishing pad.
- Work in small sections, using overlapping passes.
- Use a polishing machine or apply by hand with a microfiber applicator pad.
- Apply light pressure and move the polisher slowly.
- Wipe off any residue with a clean microfiber towel.
If you're using a machine polisher, start with the lowest speed setting and gradually increase it as needed. The goal is to remove the oxidized layer without creating swirl marks. Remember to keep the pad clean and apply fresh compound as needed. The angle at which you hold the polisher can also affect the outcome – experiment to find what works best for your car's surface.
Polishing with Polish
After using a compound, you need to refine the paint with a polish. Polish is less abrasive than compound and is designed to remove swirl marks and enhance the shine. Here's the process:
- Apply a small amount of polish to a polishing pad.
- Work in small sections, using overlapping passes.
- Use a polishing machine or apply by hand with a microfiber applicator pad.
- Apply light pressure and move the polisher slowly.
- Wipe off any residue with a clean microfiber towel.
Choosing the right polish is important. Look for polishes specifically designed for the type of paint on your car (e.g., clear coat, single-stage). Some polishes also contain fillers that can temporarily hide imperfections, but it's best to use a polish that actually corrects the paint rather than masking the problem. Proper lighting is critical to see how effectively the polish is working. Use a bright, focused light to inspect the paint for any remaining swirl marks or imperfections.
Waxing or Sealing the Paint
After polishing, it's essential to protect the newly restored paint with a layer of wax or sealant. Wax provides a sacrificial layer of protection against UV rays, acid rain, and other environmental contaminants. Sealants offer a longer-lasting protection and often have better resistance to heat and detergents. Here's how to apply wax or sealant:
- Apply a thin, even layer of wax or sealant to the paint.
- Allow it to dry according to the product instructions.
- Buff off the residue with a clean microfiber towel.
Many people debate whether wax or sealant is better. Wax provides a deeper shine and a warmer look, while sealant offers superior durability. Consider your priorities and the climate you live in when making your choice. Some detailers recommend applying a sealant followed by a wax for the best of both worlds. Regardless, remember that this is a protective layer, and one of the most important steps in preventing oxidation from forming again. A good quality product is important!
Preventing Future Oxidation
Once you've successfully fixed the oxidized car paint, you'll want to take steps to prevent it from happening again. Prevention is always better (and cheaper!) than a complete restoration. Consider these tips:
- Regular Washing: Wash your car regularly to remove dirt, grime, and other contaminants that can accelerate oxidation.
- Waxing/Sealing: Apply a coat of wax or sealant every few months to protect the paint from UV rays and other environmental factors.
- Parking in the Shade: Whenever possible, park your car in the shade to minimize exposure to the sun's damaging UV rays.
- Use Car Covers: If you don't have access to a garage or shaded parking, use a car cover to protect the paint from the elements.
- Avoid Harsh Chemicals: Use p H-neutral car wash soaps and avoid harsh chemicals that can strip away the protective layer of wax or sealant.
By following these simple preventative measures, you can keep your car's paint looking shiny and new for years to come. Think of it as an investment in the long-term appearance and value of your vehicle. Just a little routine maintenance can save you a lot of time, money, and effort in the long run.
When to Call a Professional
While many cases of oxidized car paint can be fixed at home, there are situations where it's best to call a professional detailer. If the oxidation is severe, the clear coat is heavily damaged, or you're not comfortable using power tools, it's best to leave the job to the experts. Professionals have the knowledge, experience, and equipment to safely and effectively restore even the most severely oxidized paint. A professional can also assess the condition of the paint and recommend the best course of action.
For example, if the oxidation has penetrated to the base coat, a professional detailer may need to wet sand the paint before polishing. This is a delicate process that requires specialized skills and equipment. Trying to wet sand the paint yourself without the proper training can easily damage the paint beyond repair. Don't be afraid to call a professional to get a quote for the work, or to get advice if you are thinking of tackling the project yourself.