Ever tripped over a wave in your carpet? That pesky buckling can be more than just an eyesore; it's a safety hazard waiting to happen. But don't worry, you don't necessarily need to call in a professional. Fixing buckled carpet is often a DIY project you can tackle yourself with a little patience and the right tools. Let's explore how to get your carpet smooth and flat again! Why is My Carpet Buckling? Understanding the Root Causes Before you dive into fixing the problem, it's helpful to understand why your carpet is buckling in the first place. Identifying the cause will not only help you choose the right solution but also prevent the problem from recurring. Common Culprits Behind Carpet Buckling: Improper Installation: This is the most frequent offender. If the carpet wasn't stretched correctly during installation, it's prone to loosening and buckling over time. Humidity: Excessive moisture can cause the carpet fibers and...
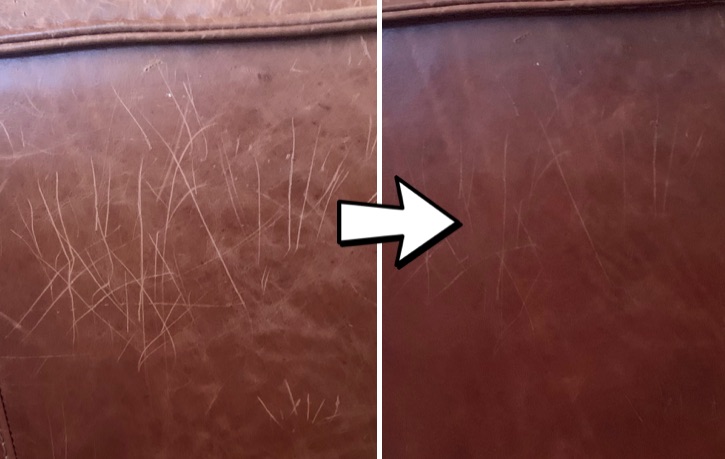
Oh no! Your beautiful leather couch, jacket, or car seat has a scratch. Don't panic! Scratches happen, and they don't have to be the end of the world. With a little know-how and some readily available supplies, you can often repair those unsightly marks and restore your leather to its former glory. Let's explore how to fix a leather scratch like a pro, giving your beloved leather items a new lease on life.
Understanding Leather Scratches
Before diving into fixing the scratch, it's important to understand what you're dealing with. Not all scratches are created equal, and the type of scratch will influence the repair method. Generally, leather scratches fall into a few categories:
- Superficial Scratches: These are surface-level blemishes that only affect the top finish or color of the leather. They're often caused by fingernails, pets, or minor abrasions.
- Minor Scratches: These penetrate a bit deeper, affecting the grain of the leather but not causing significant damage. They might be visible as discoloration or slight indentations.
- Deep Scratches/Cuts: These are the most severe, going deep into the leather's structure and potentially requiring professional repair. They can be caused by sharp objects or significant impacts.
Identifying the type of scratch is the first step to understanding the best method to proceed with the repair.
Essential Supplies for Fixing Leather Scratches
Having the right tools and supplies on hand is crucial for a successful leather scratch repair. Here's a list of essentials:
- Leather Cleaner: A gentle cleaner specifically designed for leather is essential for removing dirt, grime, and oils from the affected area. Avoid harsh chemicals or abrasive cleaners.
- Soft Cloths: Use lint-free microfiber cloths for cleaning, applying conditioners, and buffing.
- Leather Conditioner: A good leather conditioner will help moisturize the leather, making it more pliable and easier to work with. It also helps prevent further damage and cracking.
- Leather Repair Kit (Optional): For deeper scratches, a leather repair kit can be a lifesaver. These kits typically include fillers, dyes, and applicators for more extensive repairs.
- Leather Dye or Colorant: If the scratch has removed some of the color, you'll need a leather dye or colorant that matches the original color of your leather.
- Heat Gun or Hair Dryer: Gentle heat can help soften the leather and allow it to better absorb conditioners and dyes. Be careful not to overheat the leather.
- Leather Glue (Optional): For frayed edges or loose fibers, a small amount of leather glue can help secure them.
- Sanding Block or Fine-Grit Sandpaper: For smoothing out rough edges or imperfections, use a very fine-grit sandpaper (600-grit or higher) or a sanding block.
Having these supplies available ensures a smooth and effective scratch removal process.
How to Fix a Minor Leather Scratch: Step-by-Step Guide
For superficial or minor scratches, the following method often yields excellent results:
Step 1: Clean the Leather
Begin by cleaning the scratched area and the surrounding leather with a leather cleaner. Apply the cleaner to a soft cloth and gently wipe the area in a circular motion. This removes dirt, grime, and oils that can interfere with the repair process. Allow the cleaner to dry completely before proceeding.
Step 2: Apply Leather Conditioner
Once the leather is clean and dry, apply a generous amount of leather conditioner to the scratched area and the surrounding leather. Massage the conditioner into the leather using a soft cloth, paying particular attention to the scratch. The conditioner will help moisturize the leather, making it more pliable and less noticeable. Allow the conditioner to absorb for at least 30 minutes, or ideally overnight.
Step 3: Gently Buff the Area
After the conditioner has absorbed, use a clean, soft cloth to gently buff the area in a circular motion. This will help blend the scratch with the surrounding leather and remove any excess conditioner. The friction from buffing can also help generate a little heat, which can further smooth out the scratch.
Step 4: Repeat if Necessary
For more stubborn scratches, you may need to repeat steps 2 and 3 several times. Be patient and persistent, and you should see improvement with each application. Remember to allow the conditioner to fully absorb before buffing.
How to Fix a Deeper Leather Scratch or Cut
Deeper scratches and cuts require a more involved approach. These steps will help you address more significant damage:
Step 1: Clean the Area Thoroughly
As with minor scratches, start by thoroughly cleaning the area around the scratch or cut. Use a leather cleaner and a soft cloth to remove any dirt, grime, or oils. Allow the area to dry completely.
Step 2: Trim Any Frayed Edges
If the scratch or cut has any frayed edges or loose fibers, carefully trim them with a sharp knife or scissors. Be careful not to cut into the surrounding leather.
Step 3: Apply Leather Glue (If Necessary)
If the edges of the scratch or cut are separated, you can use a small amount of leather glue to secure them together. Apply a thin layer of glue to the edges and gently press them together. Hold them in place with tape or clamps until the glue is completely dry.
Step 4: Fill the Scratch with Leather Filler
Apply a small amount of leather filler to the scratch or cut, using a spatula or applicator. Overfill the area slightly, as the filler will shrink as it dries. Allow the filler to dry completely according to the manufacturer's instructions. This may take several hours or even overnight.
Step 5: Sand the Filler Smooth
Once the filler is dry, use fine-grit sandpaper (600-grit or higher) or a sanding block to carefully sand the filled area smooth and flush with the surrounding leather. Be careful not to sand too much, as this can damage the leather. Wipe away any sanding dust with a clean cloth.
Step 6: Apply Leather Dye or Colorant
If the scratch or cut has removed some of the color, you'll need to apply a leather dye or colorant that matches the original color of your leather. Apply the dye or colorant to the filled area using a sponge or applicator, blending it seamlessly with the surrounding leather. Allow the dye or colorant to dry completely.
Step 7: Apply Leather Conditioner
Finally, apply a generous amount of leather conditioner to the repaired area and the surrounding leather. This will help moisturize the leather, making it more pliable and blending the repair with the original leather. Allow the conditioner to absorb for at least 30 minutes, or ideally overnight.
Step 8: Buff the Area
Buff the area gently with a clean, soft cloth. This will help blend the repair and remove any excess conditioner.
Preventing Future Leather Scratches
Prevention is always better than cure! Here are some tips to help prevent future leather scratches:
- Regular Cleaning and Conditioning: Keeping your leather clean and conditioned will help keep it supple and resistant to scratches.
- Protect from Sharp Objects: Be mindful of sharp objects that could scratch your leather, such as keys, pens, and jewelry.
- Pet Care: Keep your pets' nails trimmed and provide them with appropriate scratching posts to prevent them from scratching your leather furniture.
- Use Leather Protectors: Consider using a leather protector spray to create a barrier against scratches and stains.
By following these tips, you can help keep your leather looking its best for years to come.
When to Seek Professional Help for Leather Scratches
While many leather scratches can be repaired at home, some damage is best left to the professionals. Consider seeking professional help if:
- The scratch is very deep or extensive.
- The leather is heavily damaged or torn.
- You are unsure about the repair process.
- The leather is rare, antique, or of high value.
A professional leather repair specialist has the tools, expertise, and experience to handle even the most challenging repairs, ensuring that your leather is restored to its original beauty. They are often better equipped tofix a leather scratch in situations where the damage is too extensive or the leather is too delicate for DIY methods. They can also expertly match the dye color if the leather is an odd color or has been distressed. So, even though it may cost more, sometimes it is better to seek professional help tofix leather scratches on your prized leather items.
Conclusion
Fixing a leather scratch might seem daunting, but with the right tools, techniques, and a little patience, you can often achieve excellent results. By understanding the type of scratch you're dealing with and following the appropriate steps, you can restore your leather to its former glory and enjoy its beauty for years to come. Remember, prevention is key, so take steps to protect your leather from future scratches. Happy repairing!