Ever tripped over a wave in your carpet? That pesky buckling can be more than just an eyesore; it's a safety hazard waiting to happen. But don't worry, you don't necessarily need to call in a professional. Fixing buckled carpet is often a DIY project you can tackle yourself with a little patience and the right tools. Let's explore how to get your carpet smooth and flat again! Why is My Carpet Buckling? Understanding the Root Causes Before you dive into fixing the problem, it's helpful to understand why your carpet is buckling in the first place. Identifying the cause will not only help you choose the right solution but also prevent the problem from recurring. Common Culprits Behind Carpet Buckling: Improper Installation: This is the most frequent offender. If the carpet wasn't stretched correctly during installation, it's prone to loosening and buckling over time. Humidity: Excessive moisture can cause the carpet fibers and...
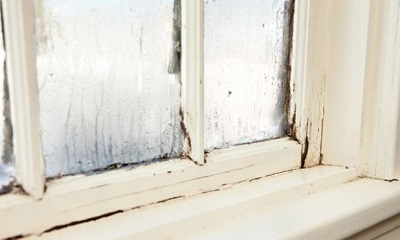
Is there anything worse than feeling a cold breeze sneaking in while you're trying to relax in your own home? Drafty windows are a common problem, especially in older houses, and they can make your energy bills skyrocket. Luckily, fixing those drafty windows is often a DIY project you can tackle yourself. Let's get started and make your home cozy and energy-efficient again!
Identifying the Source of Drafts From Windows
Before you start slathering caulk everywhere, it's crucial to pinpoint exactly where the drafts are coming from. Understanding the source will help you choose the most effective solution. You don’t want to apply weather stripping to a location that isn’t the source of the draft! Here are a few methods to help you identify drafts from your windows:
The Candle or Incense Test
This is a simple but effective method. On a still day (no wind!), light a candle or a stick of incense and slowly move it around the edges of your window frame, where the window meets the frame, and around the window sash. If the flame flickers or the smoke wavers, you've found a draft. Mark these spots for later attention. Remember to be careful when using open flames, and keep a fire extinguisher nearby.
The Hand Test
This one's even simpler! On a cold day, simply run your hand along the edges of your window frame, the sash, and where the window meets the wall. You should be able to feel the cold air seeping in if there's a draft. Pay close attention to corners and areas where materials meet.
The Paper Test
For casement or awning windows (windows that crank open), try the paper test. Open the window, place a piece of paper between the window and the frame, and then close the window. If you can easily pull the paper out, the seal is weak, and you've identified a potential draft source. Repeat this test around the entire perimeter of the window.
Inspect the Caulk and Weather Stripping
Visually inspect the caulk around the exterior of the window frame and the weather stripping around the window sash. Look for cracks, gaps, or areas where the caulk or weather stripping is missing or damaged. These are prime suspects for draft entry. Sometimes, the caulk and weather stripping may look like they are in good condition, but they aren’t providing a tight seal. Pay close attention to this.
How To Fix Drafty Windows: Quick and Easy Solutions
Once you've identified the drafty areas, it's time to take action! Here are some of the most common and effective solutions for fixing drafty windows. These solutions range in cost and effort, so choose the ones that best fit your needs and budget.
Re-Caulking Windows: Sealing Gaps Around the Frame
Caulk is your first line of defense against drafts, especially around the exterior of the window frame where it meets the siding of your house. Over time, caulk can dry out, crack, and shrink, leaving gaps that let in cold air (and sometimes water!).
How to Re-Caulk:
- Remove the old caulk: Use a utility knife or caulk removal tool to carefully scrape away the old, cracked caulk. Be thorough to ensure a clean surface for the new caulk to adhere to.
- Clean the surface: Wipe down the area with a damp cloth to remove any dirt, debris, or mildew. Allow it to dry completely.
- Apply the new caulk: Load a caulk gun with a tube of exterior-grade caulk (silicone or acrylic latex caulk are good choices). Cut the tip of the caulk tube at a 45-degree angle, and apply a smooth, even bead of caulk along the seam.
- Smooth the caulk: Use a wet finger or a caulk smoothing tool to smooth the bead of caulk and press it firmly into the gap. This will create a watertight seal.
- Clean up: Wipe away any excess caulk with a damp cloth.
Pro Tip: Choose a caulk color that matches your siding for a seamless look. Also, don't apply caulk on a rainy day or when temperatures are below freezing, as this can affect its adhesion and curing time.
Replacing Weather Stripping: Creating a Tight Seal
Weather stripping is the material that seals the gap between the window sash and the window frame. Like caulk, weather stripping can wear out over time, becoming brittle, cracked, or compressed. Replacing it is a relatively easy and inexpensive way to fix drafty windows.
Types of Weather Stripping:
- Felt weather stripping: Inexpensive and easy to install, but not very durable. Best for low-traffic areas.
- Foam weather stripping: Offers good insulation and is easy to compress. Available in various thicknesses and widths.
- V-strip weather stripping: Made of durable plastic or metal, it creates a tight seal when the window is closed.
- Rubber weather stripping: Durable and long-lasting, offering excellent protection against drafts.
How to Replace Weather Stripping:
- Remove the old weather stripping: Peel off the old weather stripping. Use a scraper or utility knife to remove any stubborn pieces.
- Clean the surface: Clean the area where the weather stripping will be applied with a damp cloth. Allow it to dry completely.
- Measure and cut the new weather stripping: Measure the length of the area where you'll be applying the weather stripping, and cut the new weather stripping to size.
- Apply the new weather stripping: Peel off the backing and press the weather stripping firmly into place. Ensure it's properly aligned and creates a tight seal when the window is closed.
Pro Tip: When choosing weather stripping, consider the type of window you have and the size of the gap you need to fill. Also, be sure to clean the surface thoroughly before applying the new weather stripping, as this will help it adhere better.
Applying Window Film: An Insulating Layer
Window film is a thin, transparent film that you apply to the inside of your window glass. It acts as an insulating layer, reducing heat loss in the winter and heat gain in the summer. This method of fixing drafty windows is very cost effective and easy to apply.
Types of Window Film:
- Low-E window film: Reflects heat back into the room, helping to keep it warm in the winter.
- Solar control window film: Reduces glare and blocks harmful UV rays, helping to keep your home cool in the summer.
- Insulating window film: Adds an extra layer of insulation to your windows, reducing heat loss and gain.
How to Apply Window Film:
- Clean the window: Thoroughly clean the window glass with a glass cleaner and a lint-free cloth.
- Measure and cut the film: Measure the window and cut the film slightly larger than the window size.
- Spray the window: Spray the window with a solution of water and a few drops of dish soap.
- Apply the film: Peel off the backing of the film and carefully apply it to the window, starting at the top.
- Smooth the film: Use a squeegee to smooth out any air bubbles or wrinkles.
- Trim the edges: Use a utility knife to trim any excess film around the edges of the window.
Pro Tip: Watch a few tutorial videos before applying window film to get a better understanding of the process. Also, be sure to use a sharp utility knife to trim the edges of the film, as this will prevent tearing.
Using Draft Stoppers: Simple and Effective
Draft stoppers are fabric tubes filled with insulating material that you place at the bottom of your windows to block drafts. They're a simple and effective way to prevent cold air from entering your home.
Types of Draft Stoppers:
- Fabric draft stoppers: Filled with materials like rice, beans, or sand, these are easy to make or buy.
- Foam draft stoppers: These are made of dense foam and provide a more rigid barrier against drafts.
- Adjustable draft stoppers: These can be adjusted to fit different window sizes.
How to Use Draft Stoppers:
- Measure the width of your window: Measure the width of the bottom of your window to determine the appropriate length for the draft stopper.
- Place the draft stopper: Simply place the draft stopper along the bottom of the window, ensuring it's snug against the frame.
Pro Tip: You can easily make your own draft stoppers using fabric scraps and filling materials. This is a great way to recycle old materials and save money.
Long-Term Solutions for Drafty Windows
While the quick fixes above can help reduce drafts, sometimes a more permanent solution is needed, especially if your windows are old, damaged, or poorly insulated. These longer-term solutions are more involved and costly, but they can provide significant energy savings and improve the comfort of your home.
Replacing Old Windows: A Significant Investment
If your windows are more than 20 years old or are showing signs of significant damage (rotting frames, broken seals, condensation between panes), it might be time to consider replacing them. New windows are much more energy-efficient than older models and can significantly reduce drafts and energy bills. It is also an important step in fixing those drafty windows.
Types of Replacement Windows:
- Vinyl windows: Affordable, durable, and low-maintenance.
- Wood windows: Beautiful and energy-efficient, but require more maintenance.
- Aluminum windows: Strong and durable, but not as energy-efficient as vinyl or wood.
- Fiberglass windows: Strong, durable, and energy-efficient, but more expensive than vinyl.
Things to Consider When Replacing Windows:
- Energy efficiency: Look for windows with a low U-factor (measures heat transfer) and a high Solar Heat Gain Coefficient (SHGC) (measures how well the window blocks heat from the sun).
- Installation: Hire a professional installer to ensure the windows are properly installed and sealed.
- Cost: Window replacement can be expensive, so get quotes from several contractors and compare prices.
Adding Storm Windows: An Extra Layer of Protection
Storm windows are an additional pane of glass or plastic that you install over your existing windows. They provide an extra layer of insulation, reducing drafts and improving energy efficiency. Storm windows are a good option if you don't want to replace your existing windows but still want to improve their energy performance.
Types of Storm Windows:
- Exterior storm windows: Installed on the outside of your windows.
- Interior storm windows: Installed on the inside of your windows.
- Permanent storm windows: Remain in place year-round.
- Removable storm windows: Can be removed during the warmer months.
Benefits of Storm Windows:
- Reduced drafts: Storm windows provide an extra barrier against cold air.
- Improved energy efficiency: They reduce heat loss in the winter and heat gain in the summer.
- Noise reduction: They can help reduce outside noise.
- Protection from the elements: They protect your existing windows from damage.
Conclusion: Making Your Home Cozy and Energy-Efficient
Fixing drafty windows doesn't have to be a daunting task. By identifying the source of the drafts and choosing the right solutions, you can make your home more comfortable, reduce your energy bills, and create a more energy-efficient living space. Whether you opt for a quick fix like caulk or weather stripping or invest in new windows, addressing those drafts is a smart move for your home and your wallet!